How to Draw Dragon Wings A Step-by-Step Manual
Dragons are one of the best-known mythical creatures. These mighty beasts can be found on the pages of many fantasy stories and the big and small screens. Dragons are known for many things, including their fiery breath and distinctive bat-like wings. These wings can be difficult to draw; however, a guide on drawing dragon wings is very helpful. We hope you relish this step-by-step manual on how to draw dragon wings in just 6 easy steps!
Also read: house drawing
How to Draw Dragon Wings – let’s get Initiated!
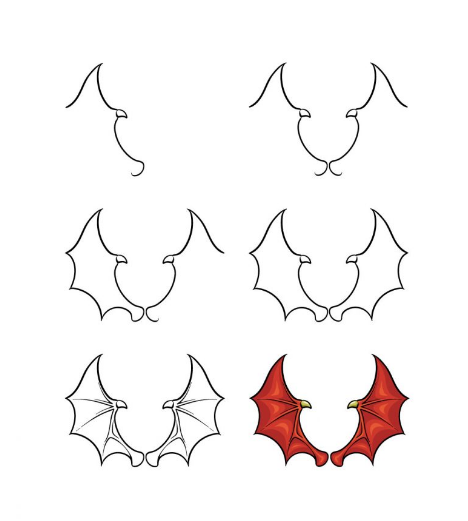
Step 1
In this first step of our guide on how to draw dragon wings, we’ll start with the edges of the wing on the left. To draw this part of the wing, you will use sharp curved lines connecting each other. The wings’ choice points vertically, as seen in the contact image.
The wings will be attached to a much thinner section with a rounded tip at the end where it would connect to the body of the dragon. You’ll also draw a small curved tip on the center bulge of the wing. Once you’re joyful with its appearance, you’re prepared for step two!
Step 2
This second part of drawing your dragon’s wings is basically about mimicking what you did in the previous step. To do this, copy everything you did in step 1, except the other way around. That’s all there is to this part, and you’re ready to go!
Step 3
Now that you have the inner edges of the wings drawn, you can start drawing the outer ones in this step of our guide on how to draw dragon wings. To do this, you’ll use longer curved lines to make the smooth, leathery edges of the wings.
Once you’re done, there should be three stitches on the outer edge of this wing. That will finish the outline of the left wing, and we’ll add some more details to it shortly.
Step 4
Drawing your dragon’s branches will be another step where you reflect on what you did in the previous step. This part will be about finishing the outer edge of the wing on the right side this time. That means he also has three points on him as the first. Then, once both outlines are complete, you’ll add some final details in the next step.
Step 5
Your image already looks great, but before adding some amazing colors to it, we have a few more final details to add in this step of our guide on drawing dragon wings. The main element of this step will be drawing something thin—lines inside the wings to create the bony structure of the wings.
You can follow the reference image to ensure the bone structure looks accurate. That will be enough for the final details of this guide, but before we continue, feel free to add a few details of your own too! You can add some cross details: shading and other line details along the wings for a leather texture detail for an idea.
Maybe I could give these dragon wings some history by drawing arrows that stick in them! If you’re feeling creative, you could draw the dragon’s head and body on the wings. You can search some dragon pictures on the internet for inspiration if you want to try this. These are just a few pictures you could try, but what else can you think of to quit off? This picture?
Step 6
This final step of drawing your dragon’s wings will involve adding amazing colors! Colors can help finish a drawing well, so this is a step where you need to express yourself with some amazing colors! For our example image, we used a bit of red and yellow to color the dragon’s wings.
Use whatever colors you like! Once you know how you like to color, you can experiment with some great art mediums! Whether you use acrylic paints, watercolors, or colored pens, we know you’ll end up with an amazing image.